Everything about Digital Wallet and Digital India Payment
Everything is getting digitalized faster with the wave of the magic wand called "Digital India". This digital transformation works like a magic. With just a touch, we can make transactions, go for online shopping, order food from home, book tickets, etc. Digital India has made a revolution in transforming our lives towards cashless economy. Digital India promotes cashless transactions for our convenience through e-payments in the form of online payment apps, cards and internet banking. There are various online payment apps available for cashless transactions. Let's see each digital wallet app in detail.
What is a Digital Wallet?
Cards were used to replace cash. As time changes, both cash and cards are replaced with mobile. Digital Wallet also called as Mobile Wallet or e-Wallet is a system which offers online transactions through computer or smartphone. Digital Wallet makes transaction easier, quicker, and safer. Digital Wallet apps protect the user's bank account details with secret password and facilitates cashless transactions.
What are the things necessary to open an account in Digital Wallet app?
To open account in a digital wallet app, all you need to have is
- Android or iphone
- Bank Account
- Mobile number linked with Bank account
- ATM card
Google Pay
Google Pay is a widely used digital wallet app which offers seamless service to its customers. It is a simple and secure payment app where you can send money, shop in online, pay bills, recharge your mobile and DTH, etc.Also, the app provides rewards and offers for your transactions.
Google Pay does not charge any fee for transactions.
How to Create Google Pay Account?
You can easily set up 'Google Pay' in your mobile by just following the steps given below.
- Download 'Google Pay' app from Google Play Store or just click the following link https://play.google.com/store/apps/details?id=com.google.android.apps.nbu.paisa.user
- Choose your language and click the arrow located at the top right corner.
- Then enter the mobile number registered with your bank account and click the arrow again.
- Google pay will seek permission to use your contacts and location. Tap 'Allow'
- Your google account will be shown in the screen. Click 'Continue'
- An OTP will be sent to your mobile number. The app will automatically verify the OTP from SMS.
- Once the verification is done, the app requests you to choose either screen lock or Google Pin. Choose any one option and tap 'Continue'
- Enter your google pin or draw your screen lock.
- You will be redirected to the home page of the app where you need to click your profile on the top left corner.
- Click 'Add Bank Account' and select your 'Bank Name'.
- After choosing your bank name, Google Pay will seek permission to make calls. Click 'Allow'.
- The bank name along with the mobile number linked to the bank account will appear on the screen. Click 'Ok'
- An SMS will be sent for verification. After that, your mobile number and bank account will be verified automatically.
- On the next page, you will be asked to enter the UPI Pin. Enter the UPI Pin if you already have it for your bank account.
- In case you don't have UPI Pin, click "Don't know your UPI Pin?"
- Enter the last six digits of your ATM card and expiry date and click the arrow button at the top right corner.
- An OTP will be sent to your mobile number. Once the OTP authentication gets completed, set your UPI Pin. Then tap the 'Tick' icon.
- You will receive a message upon successful UPI Pin set up.
- That's it. You are all set to use Google Pay!


Paytm
Paytm- Pay Through Mobile, is one of the leading online payment apps through which you can send and receive money, pay utility bills, shop online, recharge, book tickets, etc.Payment through Paytm is accepted all over the nation.
Paytm charges 5% for transferring money from your Paytm Wallet to bank account whereas bank to bank transfers are free of cost.
How to Create Paytm Account?
- Download 'Paytm' app from Google Play Store or just click the following link https://paytm.com/download-paytm-app
- Once you open the app, the app will seek permission to access your contacts and location. Tap 'Allow'.
- Then select your language.
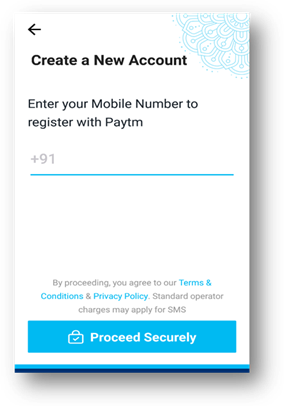
- On the next page, click 'Create a New Account'.
- Enter your mobile number to be registered with Paytm and email id and click 'Proceed'
- An OTP will be sent to your mobile number. Enter the OTP and click 'Proceed' to complete the verification process.
- Enter your First name, Last name and Date of Birth and click 'Create Account'
- That's it. You are ready to use Paytm!


PhonePe
PhonePe is a BHIM UPI based online payment app powered by Flipkart and Yes Bank. Using PhonePe, you can send money, make mobile and DTH recharges, shop in online, pay utility bill, insurance premium, credit card bill, travel and more. PhonePe provides cashback offers for transactions.
PhonePe does not charge any fee for creating new account. However, your bank may charge transaction fee for BHIM UPI transfers.
How to Create PhonePe Account?
- Download 'PhonePe' app from Google Play Store or just click the following link https://www.phonepe.com/en/
- Open the app and click 'Register Now'.
- PhonePe will seek permission to access contacts and to send SMS. Click 'Allow'
- On the next page, enter your mobile number registered with the bank. An OTP will be sent to your mobile number. Enter that OTP in the OTP field and then enter your full name and then set 4-digit PhonePe Password. Then click 'Continue'
- On the home screen, tap the 'Profile' icon. You can add your BHIM UPI ID, language, address and can change your Password
- Go to 'My Money' icon located at the bottom. Under 'Payment Methods', click 'Bank accounts.' Then click 'Add New Bank Account'. Select your bank name from the list.
- Then validate your mobile number. The app will fetch and link your account details with your PhonePe account automatically.
- You can reset your UPI Pin by entering the last six digits of your ATM card and expiry date.
- Enter the OTP which you have received from your bank and set the UPI Pin.
- That's it. You are all set to use PhonePe!
BHIM
Bharat Interface for Money is a payment app powered by National Payments Corporation of India (NPCI) and launched by Narendra Modi to encourage cashless economy in India. This app makes quick transactions using UPI. With BHIM app, you can easily send money and can shop in online.
BHIM does not charge any fee for transactions.
How to Create BHIM Account?
- Download 'BHIM' app from Google Play Store or just click this link https://play.google.com/store/search?q=bhim&hl=en
- Open the app and choose your preferred language. Click 'Next'
- BHIM will seek permission to access contacts and to send SMS. Click 'Allow'
- Select the SIM which you have registered with the bank and wait for the verification process to over.
- Once your mobile number is verified, enter the four-digit pass code.
- After setting pass code, select your bank name. The app will automatically detect the bank account details linked with your mobile number.
- That's it. You are ready to use BHIM app!


Amazon Pay
Amazon, world's largest online shopping platform, through its online payment app 'Amazon Pay' offers its customers to make fast and convenient payment. This app can be used for payment both in Amazon and in other e-commerce sites.Amazon Pay provides various cash backs and discounts to its customers.
Amazon Pay levies 2.9% fee for transactions.
How to Create Amazon Pay Account?
- Download 'Amazon' app from Google Play Store or just click the link https://play.google.com/store/apps/details?id=in.amazon.mShop.android.shopping&hl=en_IN
- Login to your amazon account and click the icon on the top left corner.
- From the list, select 'Amazon Pay'.
- On the Amazon Pay page, click 'Get Started' under Amazon Pay UPI.
- Select the SIM card associated with your bank account and click 'Proceed'
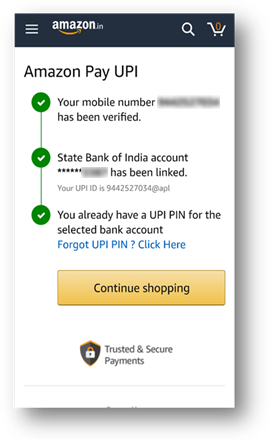
- The app will verify your mobile number. Once your mobile number has been verified, you need to select the name of your bank.
- The app will automatically detect your bank account and it will be shown below. Click 'Next'
- If you don't have UPI Pin, click 'Forgot UPI Pin'.
- Enter the last six digits of your ATM card and expiry date. Then click 'Set your UPI Pin'
- Enter the OTP sent to your mobile number and set your UPI Pin.Click the 'Tick' button.
- After completing all the process, click 'Continue Shopping'
- That's all. You are all set to make transactions via Amazon Pay!

Mobikwik
MobiKwik is India's largest digital payment app which enables you to do online recharges, bill payments, book tickets, online shopping, Insurance Premium, and EMI payments. An added benefit is that you can get instant personal loan in online without the need for security. MobiKwik provides stream of offers on transactions. MobiKwik facilitates instant transfer of money.
MobiKwik charges 2.9% of the transfer amount for transactions.
How to Create Mobikwik Account?
- Download 'Mobikwik' app from Google Play Store or just click the link https://play.google.com/store/apps/details?id=com.mobikwik_new&hl=en_IN
- Open the app and enter your mobile number. Click 'Get OTP'
- An OTP will be sent to your mobile number. The app will automatically verify your mobile number using the OTP.
- On the next page, enter your bank name. The app will seek permission to make phone calls. Tap 'Allow'.
- Then select the mobile number which is linked to your bank account. After selecting the mobile number, the app will fetch your account details automatically.
- On the next page, you will see your UPI id and your account number. Your UPI setup has been completed.
- To reset your UPI Pin, click 'Reset UPI Pin' and enter the last six digits of your ATM card and expiry date. Click 'Continue'
- Enter the OTP sent to your mobile number and set your UPI Pin.
- You are all set to use Mobikwik app!


JioMoney
JioMoney is an online payment app which facilitates money transactions faster. With JioMoney, you can send or request money, pay bills, recharge mobile and DTH, pay at shop, donate for charity homes, etc. You can get coupons, offers, discounts and cash backs directly from the merchants itself.
There are no transaction charges for using JioMoney.
How to create JioMoney Account?
- Download 'JioMoney Wallet' app from Google Play Store or just click this link https://play.google.com/store/apps/details?id=com.corpay.mwallet&hl=en_IN
- Open the app. The app will seek permission to make phone calls and to access location. Tap 'Allow'
- Select your mobile number to continue verification process. Click 'Send SMS'
- The app will again seek permission to send SMS. Tap 'Allow'. You will be sent an SMS intimating the beginning of registration process.
- The app will again seek permission to access your contacts. Tap 'Allow'
- Sign up by entering your first name, second name and add email id.
- On the next page, enter your date of birth and select your gender. Click the 'Save' button located at the top right corner.
- Then set a strong alphanumeric password and click 'Confirm Password'
- Re-enter the same password and agree to the terms and conditions. Click 'Register'
- Then select any one type of your ID and provide your ID details. Click 'Confirm'
- Enter the OTP sent to your mobile number and secure your wallet with four-digit pin.
- You are ready to make transactions using JioMoney Wallet!


Freecharge
Freecharge is an Indian digital wallet app which provides fast, smooth and safe transactions. With Freecharge, you can send and receive money, recharge your mobile, DTH, datacard, pay bills, and can invest in mutual funds. Freecharge provides you with rewards, special offers, cash backs and coupons.
Freecharge offers transaction at free cost.
How to Create Freecharge Account?
- Download 'Freecharge' app from Google Play Store or just click this link https://play.google.com/store/apps/details?id=com.freecharge.android&hl=en_IN
- Open the app. The app will seek permission to send SMS and to make phone calls. Tap 'Allow'
- Enter your mobile number registered with your bank account and click 'Continue'
- An OTP will be sent to your mobile number. The app will automatically verify your mobile number using the OTP.
- On the next page, click 'Accept' to agree with the private policy.
- On the home page, click 'Account' located at the bottom right corner. Then click 'BHIM UPI Settings'
- You need to complete the three step UPI registration. First select the mobile number to register. Click 'Next'
- The app will verify your mobile number. After successful verification, you will be asked to link your bank account. Click 'Link Your Bank Account'
- Select your bank name. It will automatically add your bank details in the app.
- If you want to reset your UPI Pin, go to 'Account', then click 'BHIM UPI Settings'. Then click 'UPI Linked Bank Accounts' and then tap 'Reset'.
- Enter the last six digits of your ATM card and expiry date. Click 'Continue'
- Enter the OTP sent to your mobile number and set your UPI Pin.
- That's all. You are ready to use this app!


9.Oxigen Wallet
Oxigen, India's major payment solutions provider, provides you with safer, easier and seamless experience in transacting money. This app gives you offers in the form of cashback and discounts for transactions. You can send and receive money, pay bills, shop in online and even send gifts to your dear ones.
From Oxigen Wallet to bank transfer, the app charges 2% of transaction amount.
How to create account in Oxigen Wallet?
- Download 'Oxigen Wallet' app from Google Play store or just click this link https://play.google.com/store/apps/details?id=com.oxigen.oxigenwallet&hl=en_IN
- Open the app. The app will seek permission to make phone calls. Tap 'Allow'
- On the home screen, click 'Wallet' icon located at the top left corner. Click 'Login'
- Then click 'Sign up'. Again, the app will seek permission to access your contacts. Tap 'Allow'
- Create new account by entering your mobile number, first name, last name, date of birth, 6 digit numeric Password and select any one Government ID and provide that ID details. Click 'Sign Up Now'
- An OTP will be sent to your mobile number. Enter that OTP and click 'Verify'
- The app will seek permission to access location. Click 'Allow'
- On the next page, you will be displayed a message upon successful creation of account. Then enter your email id. Click 'Let's Start'.
- That's it. Now you can make transactions using this app!


PayPal
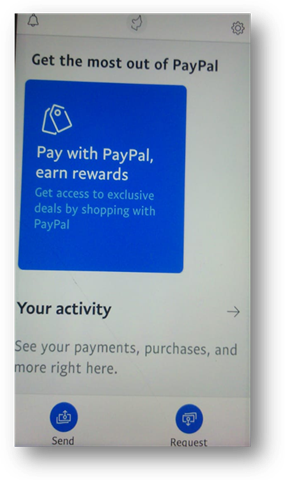
PayPal is a leading American online payment company through which you can send and receive money, make online payments faster and safer. With PayPal, you can send money anywhere around the world. You are provided with exciting offers upon shopping with PayPal.
No transaction fee for transaction from PayPal or bank account. In case of sending money using credit or debit card, you will be charged 2.9% of the amount you send.
How to Create PayPal Account?


- Download 'PayPal' app from Google Play Store or just click this link https://play.google.com/store/search?q=paypal&c=apps&hl=en_IN
- Open the app and click 'Sign Up'
- Select your country and add your mobile number. Click 'Continue'
- Enter the OTP sent to your mobile number for the app to verify. Then enter your email and password. Click 'Continue'
- In the home page, click the 'settings' icon located at the top right corner.
- Click 'Bank Accounts and Cards'. Then click 'Link a Card or Bank Account'
- To link your bank account, the app will redirect you to PayPal website where you ned to provide your bank account number and IFSC code. Click 'Continue'.
- The bank account will be added in your PayPal account between 4-6 days.
- To link your card, provide your ATM card number, expiry date and CVV. Click 'Link card' Enter the OTP and click 'Make Payment'. Your card is successfully linked to the app.
- Now you can make your transaction through this app!